Activiti is a lightweight, open source workflow and a Business Process Management (BPM) platform distributed under the Apache license. It can also be clustered and managed on a Cloud environment. It is the best platform to build BPM for people-to-people communication. It can be used very easily in every Java environment. It supports all aspects of BPM in the full context of software development. You can build any custom process language as per your requirement. It is a technology that is welcomed, because it allows people to use the tools that they are accustomed to, instead of replacing them with new ones. You can even involve a person with minimal technical know-how in implementing business workflows. It's easy to get up and running with the setup utility. It also has a superfast and rock-solid BPMN 2 process engine, which provides the best platform for collaboration between non-technical business users and technical developers.
Downloading and installing Activiti BPM

Prerequisites for Activiti
Before starting the installation of Activiti, there are some prerequisite software applications that should be installed on your system.
JDK 6 or higher
Activiti runs on a version of JDK higher than or equal to Version 6. Go to Download JDK and click on the Download JDK button. There are installation instructions on this page. To verify that your
installation was successful, run the following command in the command prompt:
java -version
Execution of this command should print the installed version of your JDK.
Eclipse Juno or Indigo
Eclipse will be required when you start working with Activiti Designer as the Activiti Designer only works with Indigo or Juno. Hence, download Eclipse Juno or Indigo from Download Eclipse, unzip the downloaded file, and you can start Eclipse from within the Eclipse folder.
To install the Activiti framework on the system, we will use Apache Tomcat; perform the following steps:
Downloading and installing Activiti BPM
To start with Activiti, we will first download it. To download Activiti, just go through its website at Download Activiti and download the latest version, activiti-5.20.0.zip, into your local system. Now extract that ZIP file and you will get all the directories for all the operating systems (the file structures will be the same). You will get the list of directories and files as shown in the following screenshot:
In the database directory, you will find the entire SQL scripting file. The wars directory contains activiti-explorer.war and activiti-rest.war. You can also find Java documents and the user guide in the docs directory. The libs directory contains all the Activiti JAR files.
Prerequisites for Activiti
Before starting the installation of Activiti, there are some prerequisite software applications that should be installed on your system.
JDK 6 or higher
Activiti runs on a version of JDK higher than or equal to Version 6. Go to Download JDK and click on the Download JDK button. There are installation instructions on this page. To verify that your
installation was successful, run the following command in the command prompt:
java -version
Execution of this command should print the installed version of your JDK.
Eclipse will be required when you start working with Activiti Designer as the Activiti Designer only works with Indigo or Juno. Hence, download Eclipse Juno or Indigo from Download Eclipse, unzip the downloaded file, and you can start Eclipse from within the Eclipse folder.
To install the Activiti framework on the system, we will use Apache Tomcat; perform the following steps:
- Download the latest Apache Tomcat from Download Tomcat and extract it onto your local system.
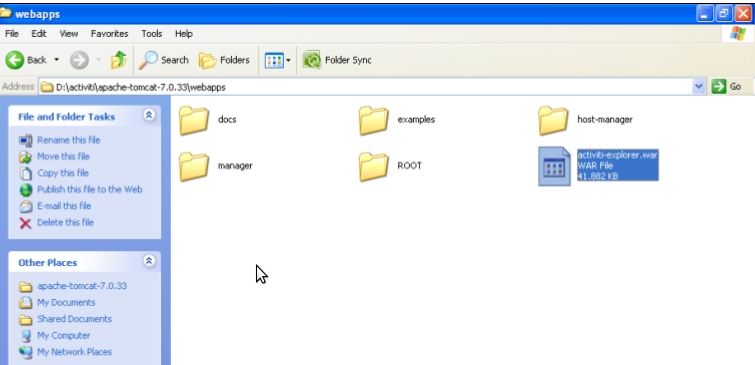
- Copy activiti-explorer.war from the activiti-5.x\wars folder and place it in the apache-tomcat-7.0.33\webapps folder, as shown in the following screenshot:
- Now we will start the Apache Tomcat server so that the activiti-explorer.war file is deployed to the webapps folder.
- The Windows operating system, browse to apache-tomcat-7.0.33\bin and double-click on startup.bat, as shown in the following screenshot:

- Now, the startup.bat file will start executing and deploying the Activiti Explorer on the system. During installation, it will set up the Activiti Engine, H2 database, default users, and much more. The result of this installation can be seen in the following screenshot:

- All the directories of the Activiti Explorer will be created on the apache-tomcat-7.0.33\webapps\activiti-explorer path once the installation is completed.
- For the Linux operating system, we can use the command prompt to start Apache Tomcat.
- The location of the war file will be the same as that for the Windows operating system. To start Apache Tomcat, we need to browse to the ../apache-tomcat-7.0.33/bin path using the command prompt and execute the following command:
sh catalina.sh run
No comments:
Post a Comment
Thanks to comment our blog. i will contact you as soon as possible